How to Build a Custom Mechanical Keyboard: The Ultimate Guide
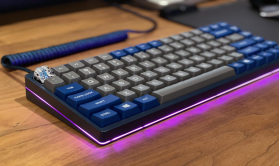
Do you love the feel of a mechanical keyboard, but find that all the off-the-shelf options don't quite fit your needs? Maybe you're looking for a specific layout, or want to add some extra features. Or maybe you just want to be able to say that you built your own keyboard from scratch. Whatever the reason, building a custom mechanical keyboard is definitely something worth considering! In this guide, we will walk you through all the steps necessary to create your perfect keyboard. Let's get started!

Steps to Create Your Custom Mechanical Keyboard
Creating your own custom mechanical keyboard is a great way to get exactly what you want out of your keyboard. Follow these steps and you'll be on your way to the perfect keyboard for you.
Step One: Choose Your Keyboard Layout
The first step in creating your custom mechanical keyboard is to choose your desired layout. Do you want a standard 104-key layout, or something more compact? Maybe you're looking for a specific layout, like an ergonomic split-keyboard design. Whatever you choose, make sure it's something that will work well for you and that you're comfortable with.
Step Two: Pick Your Switches
Once you've chosen your layout, it's time to pick your switches. This is a very important step, as the switches you choose will have a big impact on how your keyboard feels and sounds. Do some research and find out which switches are right for you. Remember that selecting switches is a matter of preference. There is no right or wrong answer.
Step Three: Choose Your Keycaps
The next step is to choose your keycaps. This is another area where there are many options to choose from. You can go with a standard set of ABS or PBT keycaps, or get something more unique, like artisan keycaps. You need to know it's important to pick something that you'll be happy with long-term.
Step Four: Buy Parts for Keyboard
Now that you've chosen your layout, switches, and keycaps, it's time to start buying them. You can either order all the parts you need from a single vendor, or you can source the parts yourself from multiple vendors. We recommend the latter option, as it gives you more flexibility and generally works out to be cheaper in the long run.
Step Five: Assemble Your Keyboard
Once you have all the parts for your keyboard, it's time to put it all together! This is the fun part where you get to see your hard work come together. If you're not sure how to do this step, don't worry - there are plenty of great guides and YouTube videos available that can walk you through the process step-by-step.
Step Six: Test PCB to Make Sure it Works
After you've assembled your keyboard, the next step is to test it out to make sure everything works as it should. The best way to do this is to use a PCB testing tool, like the Keyboard Tester from FLASHFORGE. This will help you identify any potential problems with your PCB so that you can fix them before moving on.
Step Seven: Make the Typing Test
After you've assembled your keyboard and tested the PCB, it's time to do the typing test! This is an important step, as it will help you identify any potential problems with your keycaps or switches. You can find a great typing test tool on the website.
Conclusion
Building a custom mechanical keyboard is a great way to get exactly what you want out of your keyboard. By following the steps in this guide, you'll be able to create the perfect keyboard for you. So what are you waiting for? Get started today!
Copyright © 2023 guideforests.com. All rights reserved.


